EXISTING SYSTEMS
Your spa is equipped with an electronic control system that will enable you to regulate the temperature of the water, choose the filter cycle that best suits your needs and activate the massage pumps and the blower pump. It will also enable you to turn on your spa lighting, change its colour and sequence. Depending on the design, your spa will have one of the following systems:
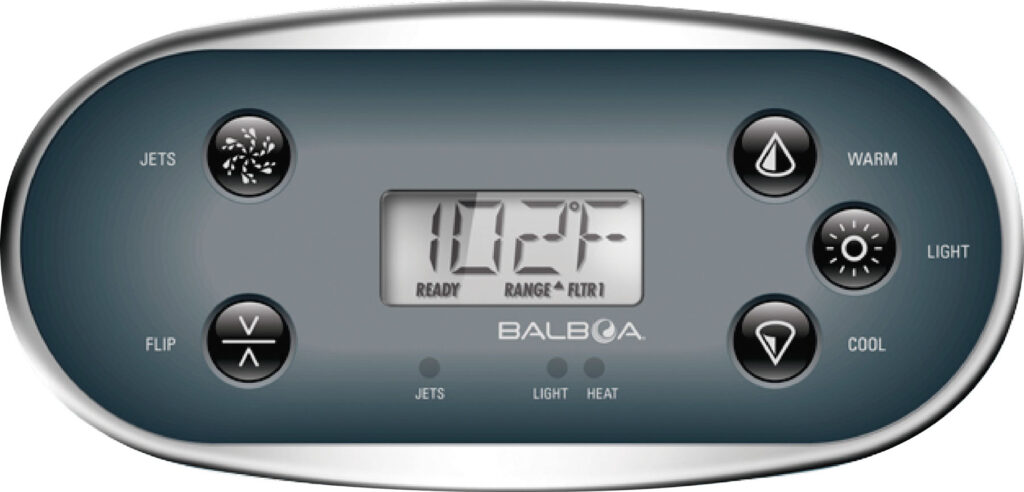
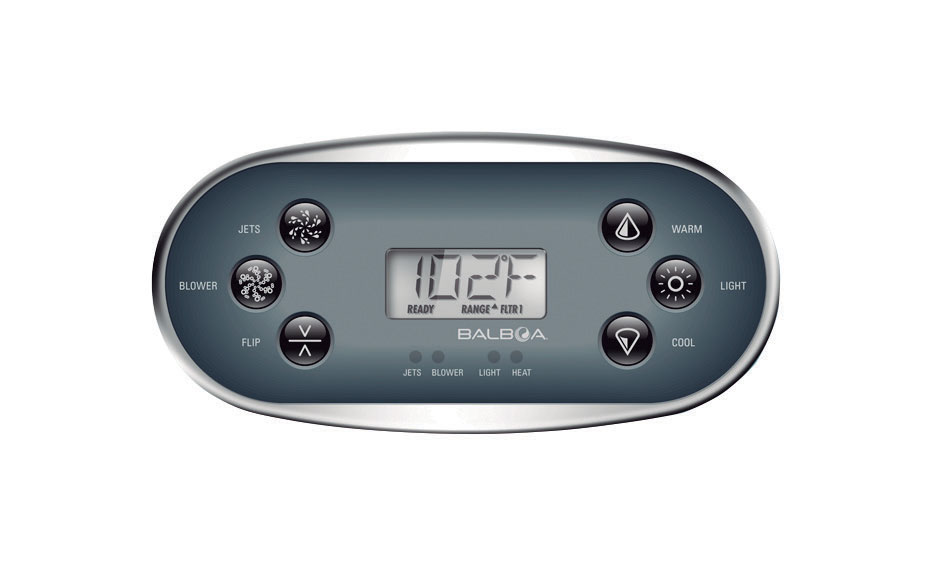
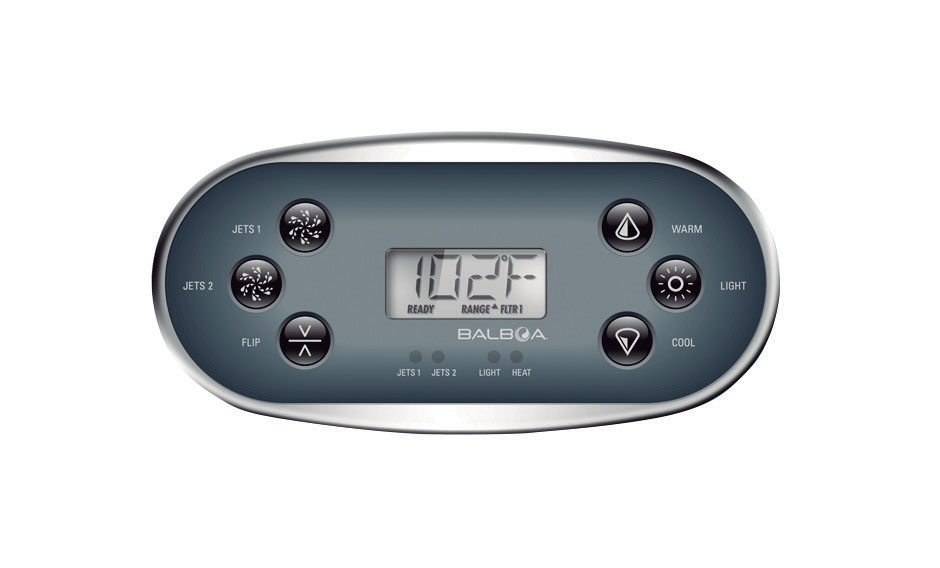
TP600
2 Speed pump
Heater
Spotlight
Circulation Pump
Massage Pumps
Turbo-Blower pump
Heater
Spotlight
Circulation Pump
2 Massage Pumps
Heater
Spotlight
AUX

2 Massage Pump
Pump
portlight (s)
Massage Pump
Sportlight (s)
CONTROL SYSTEM FOR TP600
Fill the spa to its correct operating level. Be sure to open all valves and jets in the plumbing system before filling to allow as much air as possible to escape from the plumbing and the control system during the filling process.
After turning the power on at the main power panel, the top-side panel display will go through specific sequences. These sequences are normal and display a variety of information regarding the configuration of the hot tub control.
PRIMING MODE – M019 | TP600
This mode will last for 4-5 minutes or you can manually exit the priming mode after the pump(s) have primed.

Regardless of whether the priming mode ends automatically or you manually exit the priming mode, the system will automatically return to normal heating and filtering at the end of the priming mode. During the priming mode, the heater is disabled to allow the priming process to be completed without the possibility of energizing the heater under low-flow or no-flow conditions. Nothing comes on automatically, but the pump(s) can be energized by pushing the “Jet” buttons.If the spa has a Circ Pump, it can be activated by pressing the “Light” button during Priming Mode.
You can manually exit Priming Mode by pressing a “Temp” button (Up or Down). Note that if you do not manually exit the priming mode as described above, the priming mode will be automatically terminated after 4-5 minutes. Be sure that the pump(s) have been primed by this time.
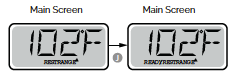
Once the system has exited Priming Mode, the top-side panel will momentarily display the set temperature but the displaywill not show the temperature yet, as shown below. This is because the system requires approximately 1 minute of water flowing through the heater to determine the water temperature and display it.

ADJUSTING THE SET TEMPERATURE | TP600
When using a panel with Up and Down buttons (Temperature buttons), pressing Up or Down will cause the temperature to flash. Pressing a temperature button again will adjust the set temperature in the direction indicated on the button. When the LCD stops flashing, the spa will heat to the new set temperature when required.
If a Temperature button is pressed and held when the temperature is flashing, the temperature will continue to change until the button is released.
MODE READY & REST / READY IN REST MODE | TP600
In order for the spa to heat, a pump needs to circulate water through the heater. The pump that performs this function is known as the “heater pump.” The heater pump can be either a 2-Speed Pump 1 or a circulation pump. READY Mode will circulate water every 1/2 hour, using Pump 1 Low, in order to maintain a constant water temperature, heat as needed, and refresh the temperature display. This is known as “polling.”
REST Mode will only allow heating during programmed filter cycles. Since polling does not occur, the temperature display may not show a current temperature until the heater pump has been running for a minute or two.
If the spa is configured for 24HR circulation, the heater pump generally runs continuously. Since the heater pump is always running, the spa will maintain set temperature and heat as needed in Ready Mode, without polling.
In Rest Mode, the spa will only heat to set temperature during programmed filter times, even though the water is being filtered constantly when in Circulation Mode.
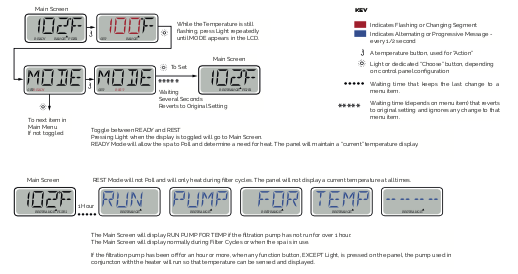
READY-IN-REST MODE | TP600
READY/REST appears in the display if the spa is in Rest Mode and Jet 1 is pressed. It is assumed that the spa is being used and will heat to set temperature. While Pump 1 High can be turned on and off, Pump 1 Low will run until set temperature is reached, or 1 hour has passed. After 1 hour, the System will revert to Rest Mode. This mode can also be reset by entering the Mode Menu and changing the Mode.
PRE-SET FILTER CYCLES | TP600

PURGE CYCLES | TP600
In order to maintain sanitary conditions, as well as protect against freezing, secondary water devices will purge water from their respective plumbing by running briefly at the beginning of each filter cycle. (Some systems will run a certain number of purge cycles per day, independent of the number of filter cycles per day. In this case, the purge cycles may not coincide with the start of the filter cycle.)
If the Filter Cycle 1 duration is set for 24 hours, enabling Filter Cycle 2 will initiate a purge when Filter Cycle 2 is programmed to begin.
MEANING OF FILTER CYCLES | TP600
1. The heating pump always runs during the filter cycle*
2. In Rest Mode, heating only occurs during the filter cycle
3. Purges happen at the start of each filter cycle
* For example, if your spa is set up for 24/hour circulation except for shutting off when the water temperature is 3˚F/1.3˚C above the set temperature, that shutoff does not occur during filter cycles.
CONTROL SYSTEM FOR Touch panel
Fill the spa to its correct operating level. Be sure to open all valves and jets in the plumbing system before filling to allow as much air as possible to escape from the plumbing and the control system during the filling process.
After turning the power on at the main power panel, the top-side panel will display a splash screen or startup screen.
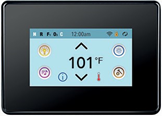
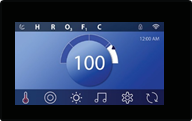
MAIN SCREEN | TOUCH PANEL
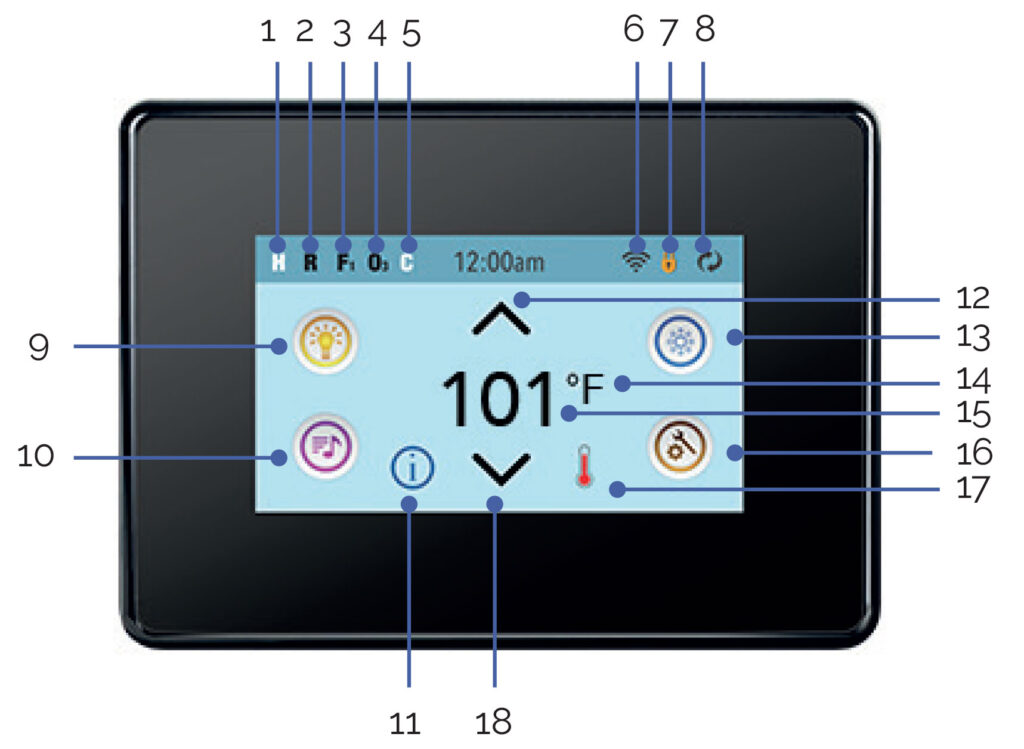
1. H = High Temperature Range. L = Low Temperature Range.
2. R = Ready Mode. RR= Ready And Rest Mode. |R= Rest Mode.
3. F1= Filter1 Mode. F2 = Filter2 Mode. F+ = Filter 1 and 2 Mode.
4. O3=Water Care (Ozone or UV, depending the system installed) is Running.
If you don’t see the icon that means the Disinfection (Ozone or UV) is OFF
5. C= Cleanup Cycle is Running.
Note: Not all systems that can run a Cleanup Cycle display this icon.
6. ![]() – Wi-Fi icon just indicates that the Wi-Fi link is connected. It does not indicate signal strength.
– Wi-Fi icon just indicates that the Wi-Fi link is connected. It does not indicate signal strength.
Note: Not all systems that support Wi-Fi display this icon.
7. Lock Icon: When displayed, indicates the panel is in a locked mode. To unlock or lock a setting or panel lock, first press the corresponding icon on the Lock Screen then press the word “Lock” for 5+ seconds until the text and icon change to the opposite state.
There are 2 lock icons that can be shown on the title bar of most screens.
A tall skinny one ![]() representing a settings lock is applied. It is shown on screens that are affected by the settings lock. And the standard lock icon
representing a settings lock is applied. It is shown on screens that are affected by the settings lock. And the standard lock icon ![]() which represents the Panel being locked. If both settings and panel are locked, only the panel lock will show since the settings lock doesn’t do much in that situation. When the panel is locked, the Settings Screen will only show items not affected by that lock (System Info and Lock Screens).
which represents the Panel being locked. If both settings and panel are locked, only the panel lock will show since the settings lock doesn’t do much in that situation. When the panel is locked, the Settings Screen will only show items not affected by that lock (System Info and Lock Screens).
8. ![]() Invert (or flip) Screen.
Invert (or flip) Screen.
9. ![]() = Light is turned ON.
= Light is turned ON. ![]() = Light is Inactive.
= Light is Inactive. ![]() = Light is Disabled.
= Light is Disabled.
10. ![]() = Music is active
= Music is active ![]() = Music is inactive.
= Music is inactive. ![]() = Music is disabled.
= Music is disabled.
11. Message Waiting Indicator:
The Message Waiting Indicator will show one of the following icons:
![]() = Fatal error (Spa can’t function until it’s fixed)
= Fatal error (Spa can’t function until it’s fixed)
![]() = Normal Error or Warning
= Normal Error or Warning
![]() = Reminder Message
= Reminder Message
![]() = Information Message
= Information Message
Some messages will include the “Call for Service” text as it requires a service technician to fix the problem. If the panel is locked and a message alert appears, you will be taken to the UNLOCK screen before you can clear the message. Touching the Error/Warning/Reminder/Info Icon on the Message Screen will take you to the System Information Screen to allow for troubleshooting over the phone or for a field service tech to better understand what is going on. Exiting the System information Screen will take you back to the Message Screen in that situation.
12. Adjust set temperature higher.
13. ![]() =Spa Equipment Control Icon. Brings up a screen where the spa jets, blower or other equipment can be controlled.
=Spa Equipment Control Icon. Brings up a screen where the spa jets, blower or other equipment can be controlled. ![]() = Jet is Inactive. Indicates if a pump is running or not.
= Jet is Inactive. Indicates if a pump is running or not.
14. Indicates if the temperature is in ºF = Fahrenheit or ºC = Celsius.
15. Current water temperature.
16. Setting Icon. ![]() = Settings is Active.
= Settings is Active. ![]() = Settings is Inactive (when a Lock is applied). Takes you to Settings Screen.
= Settings is Inactive (when a Lock is applied). Takes you to Settings Screen.
Where the available specific features that can be adjusted for the control can be adjusted. The same goes for the Utilities Screen and the Test Screen (used by Spa Technicians).
17. Indicates when the spa heater is on.
18. Adjust set temperature lower.
Note: After 30 minutes* the display will automatically go into sleep mode, which turns the display off. This is normal operation. Touch anywhere on the screen to wake the panel up.
SETTING SCREEN | TOUCH PANEL
The Settings Screen is where all programming and other spa behaviors are controlled. Each icon on the Settings screen takes you to a different screen, where one or more setting may be viewed and/or edited.

The Heat Icon ![]() takes you to a screen where you control the Heat Mode and the Temperature Range.
takes you to a screen where you control the Heat Mode and the Temperature Range.

DUAL TEMPERATURE RANGES (High vs Low) | TOUCH PANEL
This system incorporates two temperature range settings with independent set temperatures. The specific range can be selected on the Settings screen and is visible on the Main Screen in the upper left corner of the display.
These ranges can be used for various reasons, with a common use being a “ready to use” setting vs. a “vacation” setting.
Each range maintains its own set temperature as programmed by the user. This way, when a range is chosen, the spa will heat to the set temperature associated with that range.
High Range can be set between 80°F and 104°F/ 27 ºC and 40 ºC.
Low Range can be set between 50°F and 99°F / 10 ºC and 37 ºC.
Freeze Protection is active in either range.
HEAT MODE – READY vs REST | TOUCH PANEL
In order for the spa to heat, a pump needs to circulate water through the heater. The pump that performs this function is known as the “heater pump”.
The heater pump can be either a 2-speed pump (Pump 1) or a circulation pump.
Rest Mode will only allow heating during programmed filter cycles. Since polling does not occur, the temperature display may not show a current temperature until the heater pump has been running for a minute or two.
CIRCULATION MODE | TOUCH PANEL
If the spa is configured for 24HR circulation, the heater pump generally runs continuously. Since the heater pump is always running, the spa will maintain set temperature and heat as needed in Ready Mode, without polling.
In Rest Mode, the spa will only heat to set temperature during programmed filter times, even though the water is being filtered constantly when in 24HR circulation mode.
READY-IN-REST MODE | TOUCH PANEL
Ready in Rest Mode appears in the display if the spa is in Rest Mode and the Jets 1 Button is pressed. After 1 hour, the System will revert to Rest Mode. This mode can also be reset by selecting the Heat Mode line on the Screen shown here.
FILTRATION | TOUCH PANEL
Main filtration
Using the same adjustment as Setting the Time, Filter Cycles are set using a start time and a duration. Each setting can be adjusted in 15-minute increments. The panel calculates the end time and displays it automatically.
The Filter Icon ![]() on the Settings Screen takes you to a screen where you control the Filter Cycles.
on the Settings Screen takes you to a screen where you control the Filter Cycles.
Filter cycle 2 – optional filtration
Filter Cycle 2 is OFF by default. Press “1” to view Filter 1. Press “2” once to view Filter 2. Press “2” again to turn Filter 2 ON or OFF. When Filter Cycle 2 is ON, it can be adjusted in the same manner as Filter Cycle 1. It is possible to overlap Filter Cycle 1 and Filter Cycle 2, which will shorten overall filtration by the overlap amount.
Purge cycles
In order to maintain sanitary conditions, as well as protect against freezing, secondary water devices will purge water from their respective plumbing by running briefly at the beginning of each filter cycle. (Some systems will run a certain number of purge cycles per day, independent of the number of filter cycles per day. In this case, the purge cycles may not coincide with the start of the filter cycle.)
If the Filter Cycle 1 duration is set for 24 hours, enabling Filter Cycle 2 will initiate a purge when Filter Cycle 2 is programmed to begin.
Meaning of the filter cycles
1. The heating pump always runs during the filter cycle*.
2. In Rest Mode, heating only occurs during the filter cycle.
3. Purges happen at the start of each filter cycle.
* For example, if your spa is set up for 24/hour circulation except for shutting off when the water temperature is 3˚F/1.3˚C above the set temperature, that shutoff does not occur during filter cycles.